♥ Follower ♥

5 Ogos 2011

daftar and install shoutmix

3. Letak shoutmix kat blog


1. untuk letak shoutmix,hampa kena daftar dulu..klik di sini untuk daftar...
2.  klik tulisan Create Your Shoutbox Now atau bisa juga klik tulisan Sing Up untuk pendaftaran.

3. pastu hampa isi laa..
User Name : nama user
Choose password : kata laluan yang hampa mau.
Retype password: Ulangi kata laluan  di atas. tu.
Name : nama kita atau nama samaran.
Email: alamat email yang kita pakai ada.
3. Kemudian click kat kotak kecil di samping kiri I have read and agree.. untuk menyetujui perjanjian.
4. Selesai jaa., klik tombol Countinue.
pastu pada jendela baru yang terbuka , kita di suruh untuk memilih style atau design shoutboxpilih salah satunya .
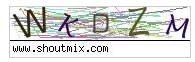
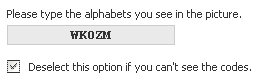
pada kotak Verification, masukan verifikasi kata.
klik lagi tombol Countinue untuk melanjutkan pada halaman berikutnya.
Setelah pendaftaran di terima, pada jendela yang terbuka klik tulisan Go to My Control Panel Now.
pada halaman yang terbuka klik Style & Color di bawah label Display, untuk membuka halaman Style & Color.
hampa ubah la font, ukuran font, warna font, warna latar, warna border yang hampa suka..
Untuk mengetahui setiap perubahan yang hampa buat klik tulisan Preview. klik tulisan Resetuntuk kembali pada tampilan default, klik tulisan save settings untuk menerima perubahan.
Kemudian di kolum kiri di bawah label navigasi tekan tulisan Back to Settings.
kalau hampa nak ubah format tarikh dan waktu hampa tinggal mengklik Date & Time di bawah tulisan Display.
dah habis semua,la ni hampa ambil code script untuk di pasangkan pada blog hampa
untuk itu hampa klik tulisan Get Code di bawah label Quick Start.
pilih dan klik tulisan Place Shoubox On Webpage.
1. Shoutbox size
Untuk sementara,hampa terima ja ukuran shoutbox, yakni lebar 140 px dan panjangnya 400 px ( ukuran ini boleh hampa ubah ikot kesesuaian dengan ukuran kolom sidebar yang hampa ada ).
2. Shoutbox option
Untuk mengaktifkan atau meng-nonaktifkan border di sisi Shoutbox.
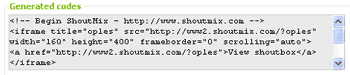
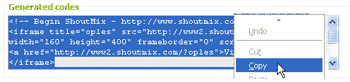
3. Generated codes
Script yang ada pada kotak Generated Code ini, merupakan javascript yang harus hampa install atau simpan ke dalam blog hampa.
untuk itu pilih semua tulisan yang ada pada kotak ini, kemudian klik kanan pilih Copy.

Install Shoutbox.

Langkah yang terakhir yaitu mengistall atau memasang Shoutbox di bagian sidebar blog. untuk itu Buka blog-nya.
1. Dalam halaman Template -> buka tab Elemen Halaman.
2. Kemudian di bagian sidebar klik Tambahkan Sebuah Halaman Elemen.
3. Pilih elemen HTML/JavaScript. kemudian klik Tambahkan Ke Blog

Letak button FOLLOW dan DASHBOARD

hai...
hari ni toturial kita tentang button follow n dashboard...
mesti hampa penah tengok kat kat blog mira...

kat blog orang lain pun ada...
mungkin ramai dah tahu...
tapi tak pa la...
jom kita sama2 buat..

1. Log in > dashboard >design >add gadget/html
2. pastu copy ayat kat bawah ni..


<div style="position: fixed; top: 5px; right: 90px;"><a class="linkopacity" href="http://www.blogger.com/follow-blog.g?blogID=BLOG ID ANDA" target="_blank" rel="nofollow" title="Follow !" imageanchor="1" style="margin-left: 1em; margin-right: 1em;"><img src="http://assets.tumblr.com/images/iframe_follow_alpha.png?6" border="0" /></a><div style="display:scroll; position:fixed; top:5px; right:2px;"><a class="linkopacity" href="http://blogger.com/home" target="_blank" rel="nofollow" title="Dashboard !" imageanchor="1" style="margin-left: 1em; margin-right: 1em;"><img border="0" src="http://assets.tumblr.com/images/iframe_dashboard_alpha.png?6" /></a></div>


3. tukar BLOG ID ANDA(yang warna pink tuh)..gantikan dengan blog id hampa


Tak tahu nak ambil mana kod ID tu ?
Design > dan anda tengok url link kat atas tu . Ada nombor banyak-banyak dekat akhir link tu . Anda copy nombor tu je ya .


4. paste n save...insyaallah..jadi lah...

letak cursors

hai...hehe,terasa nak buat toturial la pulak..
ni first toturial yang mira nak share dengan hampa semua...
tahu tak apa tu cursors?
tu la anak panah untuk kita klik tuh..
senang jaa..
meh sini mira tunjukkan..

   1. hampa pilih kod url cursors yang hampa suka...boleh pilih kat http://www.cursors-4u.com/...

   2. pastu hampa copy URL..

   3. pergi ke dashboard > design > add gadget >  html/javascript....paste kat situ  dan save..

*yang animated tu hanya untuk INTERNET EXPLORER ja ok? kalau buat jugak,sure tak jadi cursors tu..

*kalau hampa dah try tu,,comment la..sekurang2 nya mira tau hampa dah berhasil buat cursors yang cute tu..

*tapi kalau tak berhasil..tak tau kat hampa lah..hahahaha
1. Log in > Dashboard > Design > Edit Html > Tick Expand Widget Templates

2. Tekan Ctrl F serentak , cari kod ini :

]]></b:skin>

3. Dah jumpa ? Masukkan kod ini di atas kod yang korang carikan tadi : 


</style></head>
<script language="javascript" type="text/javascript">
/* toggle() checks to see if the images has already been faded
or not and sends the appropriate variables to opacity(); */
function toggle(el,milli) {
// Get the opacity style parameter from the image
var currOpacity = document.getElementById(el).style.opacity;
if(currOpacity != 0) { // if not faded
fade(el, milli, 100, 0);
} else { // else the images is already faded
fade(el, milli, 0, 100);
}
}
/* changeOpacity() uses three different opacity settings to
achieve a cross-browser opacity changing function. This
function can also be used to directly change the opacity
of an element. */
function changeOpacity(el,opacity) {
var image = document.getElementById(el);
// For Mozilla
image.style.MozOpacity = (opacity / 100);
// For IE
image.style.filter = "alpha(opacity=" + opacity + ")";
// For others
image.style.opacity = (opacity / 100);
}
/* fade() will fade the image in or out based on the starting
and ending opacity settings. The speed of the fade is
determined by the variable milli (total time of the fade
in milliseconds)*/
function fade(el,milli,start,end) {
var fadeTime = Math.round(milli/100);
var i = 0; // Fade Timer
// Fade in
if(start < end) {
for(j = start; j <= end; j++) {
// define the expression to be called in setTimeout()
var expr = "changeOpacity('" + el + "'," + j + ")";
var timeout = i * fadeTime;
// setTimeout will call 'expr' after 'timeout' milliseconds
setTimeout(expr,timeout);
i++;
}
}
// Fade out
else if(start > end) {
for(j = start; j >= end; j--) {
var expr = "changeOpacity('" + el + "'," + j + ")";
var timeout = i * fadeTime;
setTimeout(expr,timeout);
i++;
}
}
}
</script>
<div class="input" onClick="javascript:toggle('wise', 3000); this.style.display='none';
document.getElementById('june').style.display=''">
<center><img src="URL IMAGE YANG KORANG SUKA"
style="opacity:0.4;filter:alpha(opacity=40)"
onmouseover="this.style.opacity=1;this.filters.alpha.opacity=100"
onmouseout="this.style.opacity=0.7;this.filters.alpha.opacity=40"/></center>
</div>
<div id="wise" style="filter : alpha(opacity=0); -moz-opacity : 0; opacity : 0;">
<div id="june" style="display : none;">
<body>

4. Masukkan URL IMAGE YANG KORANG SUKA dekat warna merah di atas .
5. Url Image , korang boleh dapatkan di bawah ! Hambekk je sesuka hati korang ok ?

6. Lepas sudahh SAVE akan keluar KEEP WIDGET or DELETE WIDGET .
Korangg tekan DELETE WIDGET ok ? 

***pstt.. Tutorial ni , kalau dah buat tak boleh delete dah taw kod tuh.
So , nasihat Lyssa , korang buat Download Full Template dulu . SAVE kod html korang dalam PC korang . Kalau tak jadi ke hapee , at least , ada backup enn :) 
 
    
http://i.imgur.com/9qos6.png


http://i.imgur.com/77ESW.png


http://i.imgur.com/8iOw6.png


http://i.imgur.com/80cHf.png


http://i.imgur.com/cLWZ1.png


http://i.imgur.com/VC5pj.png


credit to:lysaa
Fully Design By Siti Nor Amiera | For Siti Nor Amiera 2011 - 2013 ©| Best View: Google Chrome
♥ HAK CIPTA SEPENUHNYA OLEH CLEOPATRACHENTAAMIRA ♥